

Administrator guide
Setup guide
This guide covers the first sign-in and the decisions you make right after: the administrator account, MFA (multifactor authentication), more administrators, the Legal page, retention, notifications, and the browser certificate. Install first: Installation.
First-time setup
Purpose: create the one owner account for this server. Prerequisites: the installer finished; you are on the server itself (the form is accepted only from a browser on the server, even later in network mode).
- Choose Open YuviRed on the installer's last window, or open https://127.0.0.1:8443 on the
server. Visiting
/or/loginbefore an account exists sends you to/setup. - The browser warns that the connection is not private, because the server made its own certificate. Choose Advanced, then Continue to 127.0.0.1 (unsafe) (Chrome: **Proceed to 127.0.0.1 (unsafe)**). You can pass it here because 127.0.0.1 is the server you are sitting at.
- Welcome to YuviRed, "Create your administrator account". Fill in Full Name (a.rivera), Email (a.rivera@northwind.example), Password and Confirm Password. The hint under the form ends "This account becomes the owner of this YuviRed installation." Check the email address: the console has no field to change an account's email later, and this one account is the only one that can ever manage the license (see "Add more administrators").
- Tick the checkbox "I accept the YuviRed End User License Agreement (version 1.0) and I have read the Monitoring and Data Notice". Both names are links that open the documents in a new tab.
- Choose Create Account.
What you should see: the MFA step (below), then the dashboard. The account is the owner. The setup
page cannot be used again: once an owner exists /setup redirects to /login, also after a
reinstall over the preserved data folder.
Password rules: at least 12 characters (at most 72 bytes), at least 3 of 4 kinds (lowercase, capital letters, numbers, symbols), at least 6 different characters, no common words such as "password" or "welcome" (also in disguised forms like P@ssw0rd), and not your email name or a 4-letter part of your name. Later changes may not reuse your recent passwords (Configuration, Security & Access, "Prevent password reuse", default last 5). Passwords never expire on a schedule.
Common problems and what the screen says:
| Message | Fix |
|---|---|
| Please enter your full name. / Please enter your email address. | Fill the field |
| Passwords do not match. | Retype both |
| Please accept the End User License Agreement and confirm you have read the Monitoring and Data Notice. | Tick the checkbox |
| Password must be at least 12 characters (or another rule) | Choose a stronger password |
| Setup is only available from the computer YuviRed is installed on | Open the form in a browser on the server itself |
| Setup has already been completed | An owner exists; sign in at /login |
| Cannot reach YuviRed. If it was just installed, give it a moment and try again. | Wait a minute and retry |
Rollback: none. The owner account cannot be replaced through this form again, its email cannot be changed in the console, and the administrators you add later cannot take over the license. If you typed a wrong email, email support@yuvired.com before you activate.
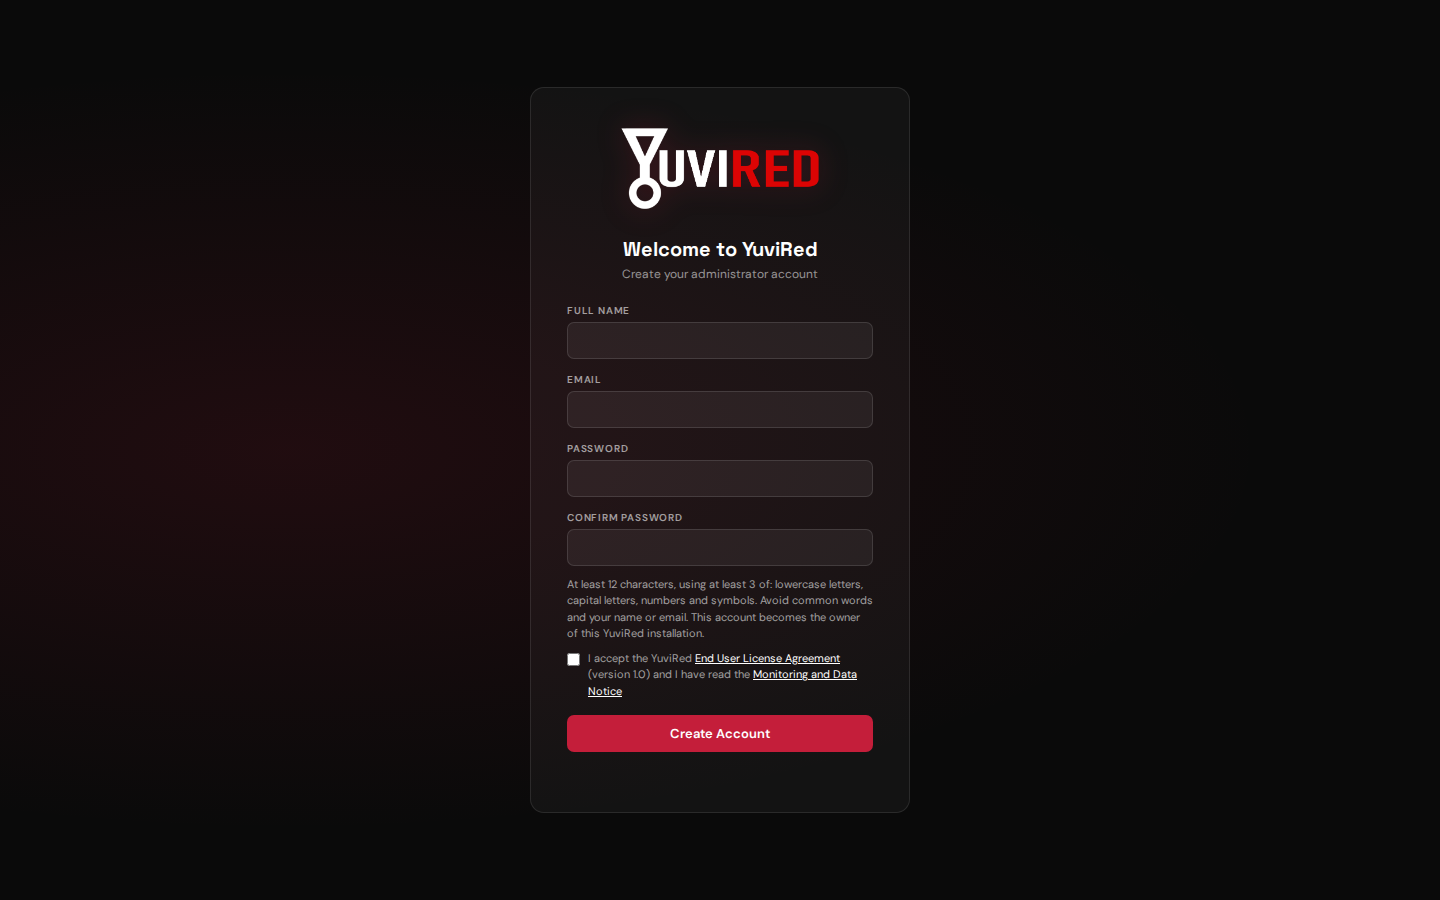
The Welcome form that creates the first administrator account.
Enroll multifactor authentication
The owner role requires MFA (the screen calls it two-factor authentication: "Your role requires two-factor authentication. Scan this QR with an authenticator app ..."), so the first sign-in goes straight to it. You have 2 minutes from choosing Create Account (or Sign In); if it ends, sign in again to get a new QR code and delete the old YuviRed entry from your authenticator app first.
- On your phone, open an authenticator app (any app that makes 6-digit time-based codes).
- Scan the QR code on the screen, or type the Secret shown under it.
- Type the app's 6-digit code into Code from your app and choose Enable & Sign In.
- YuviRed shows your 10 recovery codes (format XXXXX-XXXXX) exactly once: "Save these recovery codes now: they are shown exactly once." Choose Download .txt or Copy, store them away from your phone, tick "I have saved these recovery codes somewhere I can reach without this device. They cannot be shown again.", and choose Continue. Each code works one time.
What you should see: the dashboard. At every later sign-in you enter your email and password (Sign In), then the Verification code (the app's 6-digit code, or one recovery code), then Verify. That step also has a 2-minute window.
Recovery (what exists in this release):
- Lost phone, still have a recovery code: sign in, enter the recovery code at Verification code. Then open your account menu, Recovery Codes: Regenerate recovery codes gives a new set (the old set stops working), and Disable MFA turns MFA off for your account. Both ask for a current code from your authenticator app, not a recovery code, so with the phone gone you can only keep signing in with the remaining recovery codes until a second administrator resets you (next point). The page shows how many codes are left.
- Lost phone and no codes: another administrator (a user with the Admin role) opens Team / Users and uses the shield button on your row ("Disable MFA for a lost phone with no recovery codes"); it is audited, and you enroll a new phone at your next sign-in.
- The only administrator, phone and codes both gone: the console has no self-service reset and nothing in the product restores access. Email support@yuvired.com from the owner's address; expect this to take time. Add a second administrator on day one and keep the codes safe so you never need this.
Add more administrators
Purpose: avoid a single point of failure. Prerequisite: signed in as an administrator.
- Open Team / Users and choose Add User.
- Fill Full Name, Email, Password (the same rules), Role (Analyst, View Only or Admin) and Department, then choose Create User.
- Give the person the password through a safe channel and ask them to sign in. Anyone with the Admin role must enroll MFA at first sign-in (Configuration, Security & Access, "Require multi-factor sign-in for"; viewer accounts cannot be required).
What you should see: the toast "User created" and the person in the list.
What an added Admin can and cannot do. An Admin created here holds every permission except license management: activating, redeeming a code, importing a license file and downloading a license request belong to the owner account created at setup alone. Another user who tries sees "Only a YuviRed administrator can activate this server. Sign in with the administrator account created when YuviRed was installed." The console has no control to make a second owner or to move the owner role, and no field to change an account's email. Plan for it: keep the owner's credentials and recovery codes where your organization can reach them, and use the added Admin accounts for daily work.
The Legal page, organization name and privacy contact
The Legal page (under the admin navigation) has three panels:
- Legal documents: the End User License Agreement, Privacy Policy, Monitoring and Data Notice, "What YuviRed collects and where it goes", and Third-Party Software Notices, each with version and effective date. They are also served at https://<server>:8443/static/legal/.
- Acceptance records: the installer's and the console's acceptance (see Installation).
- Employee notice preview: the Monitoring and Data Notice with your organization name and privacy contact filled in, and Copy link to give people the notice address.
To set the names: open Configuration, section System, and fill Organization Name ("Used in notification subjects and reports", for example Northwind Dental) and Privacy contact ("Shown to the people your endpoints monitor, on the notice page", for example privacy@northwind.example). Save, then reload the Legal page: the preview now shows them. If you leave the fields empty the notice says "your organization" and "your organization's administrator". Tell the people whose computers you monitor where the notice is before you add their computers.
First configuration decisions
Open Configuration. Sections you should look at on day one:
Data & Retention (how long data is kept). Automatic Data Cleanup runs a daily cleanup. Fields: Raw telemetry (days; removed only after being summarized), Daily summaries (months), **Closed alerts** (days, 0 = keep forever), Audit log (days, 0 = keep forever; a window permanently deletes older audit records), AI agent signals, AI prompt/output events, **Decided adoption requests, and **Original prompt samples (4 hours, 24 hours recommended, or 3 days; applies only if you turn on raw capture, which is off by default). Choose what your policy and the law where you operate allow, and write it in your own notice.
Notifications (who hears about findings). Notify me about (Critical only, High and above recommended, Medium and above, Everything); Email alerts with Send alerts to, Mail server, Mail server port, Mail username, Mail password, Encrypt mail connection (TLS) and Send from address; and Slack / Microsoft Teams alerts. Nothing is sent until you set a destination.
Prompt Protection. A new install starts in Monitor Only (first-install default): detections are recorded, but no warning popup, confirmation or block appears. Nothing escalates by itself. Change it only deliberately, after you have read what users will experience.
Security & Access (MFA roles, password reuse) and System (the two names above).
What you should see after Save: the status line at the top of Configuration confirms the change.
Let other computers reach the console (network mode)
Before Add Computer can work, and before anyone else can open the console, turn on network mode. The server starts in loopback mode: it binds 127.0.0.1:8443, only a browser on the server itself reaches the console, and no other computer can enroll. In PowerShell as administrator on the server:
$py = "C:\Program Files\YuviRed\runtime\python.exe"; $yr = "C:\Program Files\YuviRed\runtime\yuvired_service.py"
& $py $yr network --name server.northwind.example     # the server's DNS name or fixed IP, e.g. 192.0.2.10
& $py $yr network --status                            # shows the bind and the firewall rule
& $py $yr network --off                               # return to loopback
It writes config\network.conf, adds the inbound rule YuviRed Server (TCP 8443) for the Domain
and Private firewall profiles only, restarts the service ("Restarting YuviRed. Keep this window open:
this usually takes a minute or two and can take up to 7 minutes."), and the server's own agent is
skipped. A server whose network is classed Public gets the warning "This server's network is set to
Public, so Windows Firewall blocks port 8443 and no other computer can connect. YuviRed does not open
the Public profile. ..." with the Set-NetConnectionProfile steps to move only the trusted network
to Private. What you should see: exit code 0, --status showing the rule present and the line
"certificate SHA-256: ...", and the console reachable at https://<name>:8443 from another computer
(with the same one-time certificate warning). Until it is on, the Add Computer panel says "Network
mode is off, so other computers cannot reach this server." and prints this command. If the server's
name or address changes later, rerun network --name and make a fresh Add Computer download on each
computer; a DNS name makes this unnecessary.
Then add computers: Agent Deployment, Add Computer, Download installer; see the Quick start step 6.
The browser certificate
The server uses a self-signed certificate, so every browser that opens the console shows a warning
the first time. The warning is expected. Pass it only for an address you know is your server. In the
Add Computer panel the Certificate SHA-256 is shown: compare it with the certificate the browser
shows, or with network --status on the server; if they differ, stop.
Replacing it with a certificate from your own authority: the product has no console setting, installer
option or documented procedure for this in this release, so this guide gives none. The certificate
files are tls-cert.pem and tls-key.pem in C:\ProgramData\YuviRed\config, and agents trust exactly
the certificate they were enrolled with. Replacing it strands every enrolled agent until each gets a
fresh Add Computer download, and the browser extension on the server pins it too. Do not replace it
by hand without asking support@yuvired.com. (Not verified: whether a hand-placed certificate that
covers the configured names is kept at the next start.)
Not verified in this guide
- Whether a hand-placed certificate survives a restart (see above).
- The exact status line wording after saving Configuration.
- The recovery paths above were read from code, not run in the lab: the self-service Disable MFA and Regenerate recovery codes prompts ask for an authenticator code, and the Team / Users reset needs a second Admin.
- The exact names of the Configuration status line after Save and of the toast after Add User ("User created") were read from code.